
CSS stands for Cascading Style Sheets and CSS is essential for creating visually engaging web pages and user interfaces for web applications. It is a language used to make websites look good by controlling how things like colors, fonts, and layout are displayed on a webpage. It was first proposed by Håkon Wium Lie in 1994 .
In this Top 60+ CSS Interview Questions and Answers article, we will provide the Interview Questions of CSS for both freshers and experienced developers . Here, we cover everything, including fundamentals of CSS , CSS Box Model, CSS Selectors, CSS Flexbox and Grid, CSS Specificity, CSS Architecture, CSS Transitions and Animations, and more, that will surely help you to crack your next CSS interview.
CSS Interview Questions and Answers (2024)
In this article, you will learn CSS interview questions and answers that are most frequently asked in interviews. Before proceeding to learn CSS interview questions and answers, first, we learn the complete CSS Tutorial .
Table of Content
C ascading S tyle S heets fondly referred to as CSS , is a simply designed language intended to simplify the process of making web pages presentable. CSS allows you to apply styles to web pages.
More importantly, CSS enables you to do this independent of the HTML that makes up each web page. CSS is easy to learn and understood, but it provides powerful control over the presentation of an HTML document.
We use CSS because of the following reasons:
CSS3 is the latest version of CSS.
S.No.
CSS
CSS3
The best CSS frameworks are:
A CSS style rule consists of a selector, property, and its value. The selector points to the HTML element where CSS style is to be applied. The CSS property is separated by semicolons.
Syntax:
selector
 Property: value;
>
Cascading Style Sheet(CSS) is used to set the style in web pages that contain HTML elements. It sets the background color, font size, font family, color, … etc properties of elements on a web page.
There are three types of CSS which are given below:
Inline CSS has the highest priority, then comes Internal/Embedded followed by External CSS which has the least priority. Multiple style sheets can be defined on one page. If for an HTML tag, styles are defined in multiple style sheets then the below order will be followed.
CSS Selectors: CSS Selectors are used to selecting HTML elements based on their element name, id, attributes, etc. It can select one or more elements simultaneously.
element selector: The element selector in CSS is used to select HTML elements which are required to be styled. In a selector declaration, there is the name of the HTML element, and the CSS properties which are to be applied to that element is written inside the brackets <>.
Syntax:
element_name
 // CSS Property
>
id selector: The #id selector is used to set the style of the given id. The id attribute is the unique identifier in an HTML document. The id selector is used with a # character.
Syntax:
#id_name
 // CSS Property
>
class selector: The .class selector is used to select all elements which belong to a particular class attribute. To select the elements with a particular class, use the (.) character with specifying the class name. The class name is mostly used to set the CSS property to the given class.
Syntax:
.class_name
 // CSS Property
>
Comments are the statements in your code that are ignored by the compiler and are not executed. Comments are used to explain the code. They make the program more readable and understandable.
Syntax:
/* content */
Comments can be single-line or multi-line.
RGBA contains A (Alpha) which specifies the transparency of elements. The value of alpha lies between 0.0 to 1.0 where 0.0. represents fully transparent and 1.0 represents not transparent.
Syntax:
h1
 color:rgba(R, G, B, A);
>
HSL: HSL stands for Hue, Saturation, and Lightness respectively. This format uses the cylindrical coordinate system.
Syntax:
h1
 color:hsl(H, S, L);
>
Example:
Output :

The CSS background properties are used to define the background effects for elements.
CSS background properties are as follows:
CSS border properties allow us to set the style, color, and width of the border.
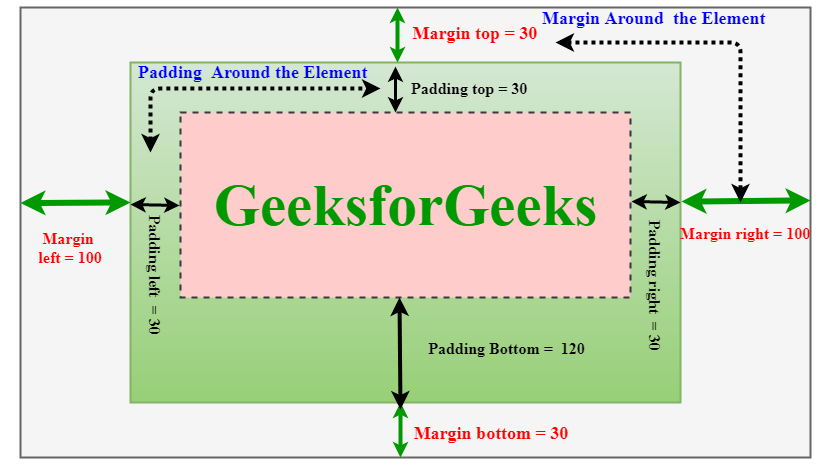
CSS margins are used to create space around the element. We can set the different sizes of margins for individual sides (top, right, bottom, left).
Margin properties can have the following values:
Therefore, margin: 40px 100px 120px 80px signifies:
Example:
Output:

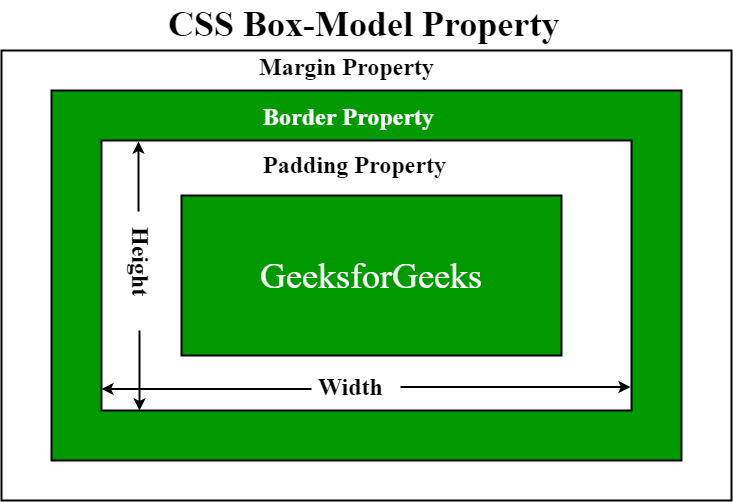
The CSS box model is a container that contains multiple properties including borders, margin, padding, and the content itself. It is used to create the design and layout of web pages. It can be used as a toolkit for customizing the layout of different elements. The web browser renders every element as a rectangular box according to the CSS box model.
Box-Model has multiple properties in CSS. Some of them are given below:
The following figure illustrates the box model.
Example:
Output:

Differences:
CSS text formatting properties are used to format text and style text.
CSS text formatting includes the following properties:
A link is a connection from one web page to another web page. CSS property can be used to style the links in various different ways.
States of Link: Before discussing CSS properties, it is important to know the states of a link. Links can exist in different states and they can be styled using pseudo-classes.
There are four states of links given below:
To add an image as the list-item marker in a list, we use the list-style-image property in CSS.
Syntax:
list-style-image: none | url | initial | inherit;
The style display property is used to hide and show the content of HTML DOM by accessing the DOM element using JavaScript/jQuery.
To hide an element, set the style display property to “none”.
display: "none";
To show an element, set the style display property to “block”.
display:"block";
Example:
Output:

The visibility property is used to hide or show the content of HTML elements. The visibility property specifies that the element is currently visible on the page. The ‘hidden’ value can be used to hide the element. This hides the element but does not remove the space taken by the element, unlike the display property.
Syntax:
visibility : 'hidden';
visibility :'visible';
Example:
Output:
Both of the property is quite useful in CSS. The visibility: “hidden”; property is used to specify whether an element is visible or not in a web document but the hidden elements take up space in the web document. The visibility is a property in CSS that specifies the visibility behavior of an element and display: “none” property is used to specify whether an element is exist or not on the website.
Syntax:
visibility: visible| hidden | collapse | initial | inherit;
display: none | inline | block | inline-block;
So, the difference between display: “none”; and visibility: “hidden”; , right from the name itself we can tell the difference as display: “none”, completely gets rids of the tag, as it had never existed in the HTML page whereas visibility: “hidden”; , just makes the tag invisible it will still be on the HTML page occupying space it’s just invisible.
Creating an overlay effect simply means putting two div together at the same place but both the div appear when needed i.e while hovering or while clicking on one of the div to make the second one appear. Overlays are very clean and give the webpage a tidy look. It looks sophisticated and is simple to design. Overlays can create using two simple CSS properties:
The z-index property is used to displace elements on the z-axis i.e in or out of the screen. It is used to define the order of elements if they overlap with each other.
Syntax:
z-index: auto|number|initial|inherit;
The position property in CSS tells about the method of positioning for an element or an HTML entity.
The position property in CSS tells about the method of positioning for an element or an HTML entity. There are five different types of position properties available in CSS:
The positioning of an element can be done using the top , right , bottom, and left properties. These specify the distance of an HTML element from the edge of the viewport. To set the position by these four properties, we have to declare the positioning method.
Let’s talk about each of these position methods in detail:
1. Fixed: Any HTML element with position: fixed property will be positioned relative to the viewport. An element with fixed positioning allows it to remain at the same position even as we scroll the page. We can set the position of the element using the top, right, bottom, and left.
2. Static: This method of positioning is set by default. If we don’t mention the method of positioning for any element, the element has the position: static method by default. By defining Static, the top, right, bottom and left will not have any control over the element. The element will be positioned with the normal flow of the page.
3. Relative: An element with position: relative is positioned relatively with the other elements which are sitting at top of it. If we set its top, right, bottom, or left, other elements will not fill up the gap left by this element.
4. Absolute: An element with position: absolute will be positioned with respect to its parent. The positioning of this element does not depend upon its siblings or the elements which are at the same level.
5. Sticky: Element with position: sticky and top: 0 played a role between fixed & relative based on the position where it is placed. If the element is placed in the middle of the document then when the user scrolls the document, the sticky element starts scrolling until it touches the top. When it touches the top, it will be fixed at that place in spite of further scrolling. We can stick the element at the bottom, with the bottom property.
The CSS overflow controls the big content. It tells whether to clip content or to add scroll bars. The overflow contains the following property:
1. Visible: The content is not clipped and is visible outside the element box.
2. Hidden: The overflow is clipped and the rest of the content is invisible.
3. Scroll: The overflow is clipped but a scrollbar is added to see the rest of the content. The scrollbar can be horizontal or vertical.
4. Auto: It automatically adds a scrollbar whenever it is required.
Overflow-x and Overflow-y: This property specifies how to change the overflow of elements. x deals with horizontal edges and y deals with vertical edges.
Float is a CSS property written in a CSS file or directly in the style of an element. The float property defines the flow of content. Below are the types of floating properties:
| Float type | Usage |
|---|---|
| float: left | Element floats on the left side of the container |
| float: right | Element floats on the right side of the container |
| float: inherit | The element inherits the floating property of its parent (div, table, etc…) |
| float: none | Element is displayed as it is (Default). |
Inline-block: This feature uses both properties: block and inline. So, this property aligns the div inline but the difference is it can edit the height and the width of the block. Basically, this will align the div both in the block and inline fashion.
Example:
Output:

This solution will work for a single line and multiple lines of text, but it still requires a fixed height container:
div
 height: 200px;
 line-height: 200px;
 text-align: center;
 border: 2px dashed #f69c55;
>
span
 display: inline-block;
 vertical-align: middle;
 line-height: normal;
>
div
 GeeksforGeeks
>
Given an image and the task is to set the image to align to center (vertically and horizontally) inside a bigger div. It can be done by using the position property of the element.
Example: This example uses the position property to make the image align to the center.
Output :

CSS combinators are explaining the relationship between two selectors. CSS selectors are the patterns used to select the elements for style purposes. A CSS selector can be a simple selector or a complex selector consisting of more than one selector connected using combinators.
There are four types of combinators available in CSS which are discussed below:
General Sibling selector: The general sibling selector is used to select the element that follows the first selector element and also shares the same parent as the first selector element. This can be used to select a group of elements that share the same parent element.
Adjacent Sibling selector: The Adjacent sibling selector is used to select the element that is adjacent or the element that is next to the specified selector tag. This combinator selects only one tag that is just next to the specified tag.
Child Selector: This selector is used to select the element that is the immediate child of the specified tag. This combinator is stricter than the descendant selector because it selects only the second selector if it has the first selector element as its parent.
Descendant selector: This selector is used to select all the child elements of the specified tag. The tags can be the direct child of the specified tag or can be very deep in the specified tag. This combinator combines the two selectors such that selected elements have an ancestor same as the first selector element.
A Pseudo class in CSS is used to define the special state of an element. It can be combined with a CSS selector to add an effect to existing elements based on their states. For Example, changing the style of an element when the user hovers over it, or when a link is visited. All of these can be done using Pseudo Classes in CSS.
Note that pseudo-class names are not case-sensitive.
Syntax:
selector: pseudo-class
 property: value;
>
There are many Pseudo-classes in CSS but the ones which are most commonly used are as follows:
Pseudo Elements: Pseudo-element in CSS is used to add style to specified parts of an element. Example: Using style before or after an element.
Syntax:
selector::pseudo-element
 property:value;
>
Use of Pseudo-Element: Below is some examples to describe the use of pseudo-element.
There are two types of Gradients:
1. Linear Gradients: It includes the smooth color transitions to going up, down, left, right, and diagonally. A minimum of two colors are required to create a linear gradient. More than two color elements can be possible in linear gradients. The starting point and the direction are needed for the gradient effect.
Syntax:
background-image: linear-gradient(direction, color-stop1, color-stop2, . );
2. CSS Radial Gradients: A radial gradient differs from a linear gradient. It starts at a single point and emanates outward. By default, the first color starts at the center position of the element and then fades to the end color towards the edge of the element. Fade happens at an equal rate until specified.
Syntax:
background-image: radial-gradient(shape size at position, start-color, . l
Yes, we can, a transformation modifies an element by its shape, size, and position. It transforms the elements along the X-axis and Y-axis.
There are six main types of 2D transformations which are listed below:
Yes, it allows changing elements using 3D transformations. In 3D transformation, the elements are rotated along the X-axis, Y-axis, and Z-axis.
There are three main types of transformation which are listed below:
Transitions in CSS allow us to control the way in which transition takes place between the two states of the element.
The transition allows us to determine how the change in color takes place. We can use the transitions to animate the changes and make the changes visually appealing to the user and hence, giving a better user experience and interactivity. In this article, we will show you how to animate the transition between the CSS properties.
There are four CSS properties that you should use, all or in part (at least two, transition-property and transition-duration, is a must), to animate the transition. All these properties must be placed along with other CSS properties of the initial state of the element:
Syntax:
transition-property: none | all | property | property1,
property2, . propertyN;
Syntax:
transition-duration: time;
Here, time can be in seconds(s) or milliseconds(ms), you should use ‘s’ or ‘ms’ after the number (without quotes).
Syntax:
transition-timing-function: ease|ease-in|ease-out|ease-in-out|linear|
step-start|step-end;
Syntax:
transition-delay: time;
Here, again, time can be in seconds(s) or milliseconds(ms), and you should use ‘s’ or ‘ms’ after the number (without quotes).
Syntax:
transition: (property name) | (duration) | (timing function) | (delay);
CSS Animations is a technique to change the appearance and behavior of various elements in web pages. It is used to control the elements by changing their motions or display. It has two parts, one which contains the CSS properties which describe the animation of the elements and the other contains certain keyframes which indicate the animation properties of the element and the specific time intervals at which those have to occur.
The @keyframes rule: Keyframes are the foundations with the help of which CSS Animations works. They define the display of the animation at the respective stages of its whole duration. For example: In the following code, the paragraph changes its color with time. At 0% completion, it is red, at 50% completion it is of orange color and at full completion i.e. at 100%, it is brown.
Example:
Output:
The box-sizing CSS property defines how the user should calculate the total width and height of an element i.e. padding and borders, are to be included or not.
Syntax:
box-sizing: content-box|border-box;
Property Values :
Media query is used to create a responsive web design. It means that the view of a web page differs from system to system based on screen or media types.
Media queries can be used to check many things:
A media query consist of a media type that can contain one or more expression which can be either true or false. The result of the query is true if the specified media matches the type of device the document is displayed on. If the media query is true then a style sheet is applied.
Syntax:
@media not | only mediatype and (expression)
 // Code content
>
It is also called a flexible box model. It is basically a layout model that provides an easy and clean way to arrange items within a container. Flexbox is different from the block model which is vertically biased and the inline which is horizontally biased. Flexbox was created for small-scale layouts and there’s another standard called grids which are geared more towards larger-scale layouts, It works similar to the way to Twitter bootstrap grid system works. Flexbox is responsive and mobile-friendly. To start with flexbox firstly create a flex container. To create a flex container set the display property to flex.
Syntax:
.main-container
 display: flex;
>
Flex Properties:
It is a CSS property that offers a grid-based layout system, with rows and columns, making it easier to design web pages without floats and positioning.

Syntax:
grid: none|grid-template-rows / grid-template-columns|grid-template-areas|
grid-template-rows / [grid-auto-flow] grid-auto-columns|[grid-auto-flow]
grid-auto-rows / grid-template-columns|initial|inherit;
1. Dimensionality and Flexibility:
2. Alignment:
3. Item Management
Property
Grid
Flexbox
Can flex combination of items through space-occupying Features
Can push content element to extreme alignment
The External Style Sheet (using HTML Tag) is the best method that is used to link the element. Maintaining and re-using the CSS file across different pages is easy and efficient. The tag is placed in the HTML element. To specify a media type=”text/css” for a Cascading Style Sheet attribute which is used to ignore style sheet types that are not supported in a browser.
@import rule: The @import rule is used to import one style sheet into another style sheet. This rule also supports media queries so that the user can import the media-dependent style sheet. The @import rule must be declared at the top of the document after any @charset declaration.
Characteristics of @import:
Syntax:
@import url|string list-of-mediaqueries;
All CSS style sheets are case-insensitive, except for portions that are not under the control of CSS. For example, the case sensitivity due to values of the HTML attributes “id” and “class”, font names, and URIs lies outside the scope of this specification.
CSS allows the animation of HTML elements without using JavaScript. An animation lets an element systematically and with proper timing, change from one style to another. You can change whatever CSS properties you want, and end a number of times, as you want it. To use CSS animation, you must first specify some @keyframes for the animation. @keyframes will describe which styles that element will have at specific times. We will be using a basic example such as the animation of a battery charging.
The @keyframes property has the option to divide the animation time into parts/percentage and perform an activity that is specified for that part of the whole duration of the animation. The @keyframes property is given to each animation according to the name of that animation. It allows you to run the animation infinitely as well.
Keyframes are the foundations with the help of which CSS Animations works. They define the display of the animation at the respective stages of its whole duration. For example: In the following code, the paragraph changes its color with time. At 0% completion, it is red, at 50% completion it is of orange color and at full completion i.e. at 100%, it is brown.
Example:
Output:
CSS counters properties: CSS counters contains the following properties:
Initialization of the CSS Counter: To use the CSS counter property firstly it must be created with the counter-reset property and the first step is resetting the counter. The counter by default initialized to a value 0(zero) with the counter-reset property.
Syntax:
counter-reset: myCounter;
Incrementation and Use of CSS Counter: To increment the counter use the CSS counter-increment property.
Syntax:
counter-increment: myCounter;
The counter() or counters() function in content is used to display the content in a particular order.
Syntax:
content: counter(myCounter);
The * selector in CSS is used to select all the elements in an HTML document. It also selects all elements which are inside under another element. It is also called the universal selector.
Syntax:
*
 // CSS property
>
Responsive Web Design comprises two words i.e., responsive and web design. Responsive means to respond and web design means to design a website. Therefore, responsive web design generally means the website that responds to or resizes or adjusts itself depending upon the screen size it is being seen through. It automatically adjusts to fit the user’s screen whether it’s desktop, laptop, mobile, tablet, etc. It only uses one layout for a web page and it can be done either using CSS and HTML or CSS3 and HTML5.
Id selector(“#”): The id selector selects the id attribute of an HTML element to select a specific element. An id is always unique within the page so it is chosen to select a single, unique element. It is written with the hash character (#), followed by the id of the element.
#element_id_name
 // CSS properties
>
Class Selector(“.”): The class selector selects HTML elements with a specific class attribute. It is used with a period character “.” (full stop symbol) followed by the class name.
.element_class_name
 // CSS properties
>
Difference between class (“.”) and id (“#”) Selectors:
Class “.”
Id “#”
Pagination is the process of dividing the document into pages and providing them with numbers.
Types of Pagination: There are many types of pagination in CSS. Some of them are given below:
Simple Pagination: This is the basic form of pagination.
Syntax:
.pagination
 display:type
>
.pagination body
 color:colorname
 decoration:type
>
The box-reflect property is used to create an image reflection.
Attributes:
Example:
Output:

The multiple columns are used to create column layouts on the web pages. There are many column properties in CSS which are listed below:
Example:
Output:

The approach of this article is to add a shadow using the text-shadow property in CSS. This property accepts a list of a comma-separated list of shadows to be applied to the text. The default value of the text-shadow property is “none”.
Syntax:
text-shadow: h-shadow v-shadow blur-radius color|none|initial|
The !important property in CSS is used to provide more weight (importance) than normal property. In CSS, the !important means that “this is important”, ignore all the subsequent rules, and apply !important rule and the !important keyword must be placed at the end of the line, immediately before the semicolon.
Syntax:
element
 color: blue !important;
 font-size: 14px !important;
 .
>
When more than one set of CSS rules applies to the same element, the browser will have to decide which specific set will be applied to the element. The rules the browser follows are collectively called Specificity
Specificity Rules include:
Specificity Hierarchy: Every element selector has a position in the Hierarchy.
The CSS Attribute Selector is used to select an element with some specific attribute or attribute value. It is an excellent way to style the HTML elements by grouping them based on some specific attributes and the attribute selector will select those elements with similar attributes.
There are several types of attribute selectors which are discussed below: